User Manual for Hobby Shop Management
The functionality of the program is to store data for a hobby shop which in this case a Gunpla hobby shop, the program can store list of items for the Hobby shop and their customer with their membership type and the program can also make a transaction that happen in the shop.
ERD
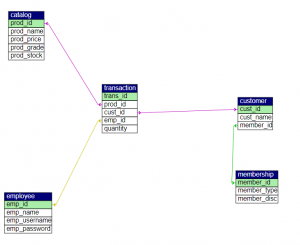
Customer have membership ID and transaction have customer ID, Employee ID, and Prod_ID
catalog (prod_id, prod_name, prod_price, prod_grade, prod_stock)
customer (cust_id, cust_name, member_id)
Foreign Key member_id references Membership (member_id) On Delete Restrict On Update Restrict
employee (emp_id, emp_name, emp_username, emp_password)
membership (member_id, member_type, member_disc)
transaction (trans_id, prod_id, cust_id, emp_id, quantity)
Foreign Key prod_id references catalog (prod_id) On Delete Restrict On Update Restrict
Foreign Key cust_id references customer (cust_id) On Delete Restrict On Update Restrict
Foreign Key emp_id references employee (emp_id) On Delete Restrict On Update Restrict
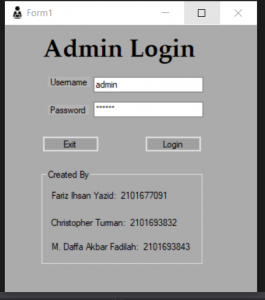
Login Form
At the start of the program the user will be directed to log in page in this page, the user must put an id and password. The ID and the password is stored in the employee table (For user that want to access the program and don’t know any username please use, Username: admin, password: 123456).
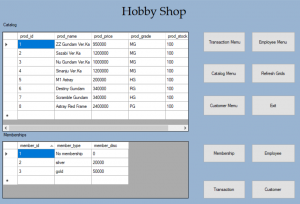
Main Menu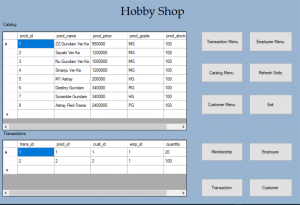
In the Main Menu section, user will be able to choose the option the program has to offer
The Transaction, Membership, Customer, Catalog, and Employee button is used to show their respective Table while the Transaction, Customer, Catalog, and Employee Menu will open a new menu in which the user will be able to add or delete data on the respective table. For example if the user choose the Membership button then the Membership table will be shown on the Main Menu.
Refresh grid function is used to update the table with the latest data, for example after you add an employee in the Employee table and the user want to see it in the main menu, the user need to click the refresh grid button to see the table on the main menu in a updated form.
Employee Menu
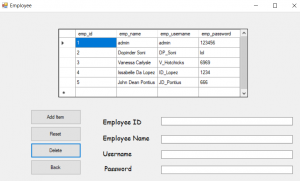
The Employee Menu is used to fill data on employee table or delete it, Employee table is used to determine the employee that handle certain transaction which will be shown later and provide username and password for the login menu.
In order to add another employee first you need to fill the box with the necessary data.
The first data that you need to fill is Employee ID, the user can choose any number for the ID as long as it is not the same as another Employee ID number.
The second data is Employee Name which determine the employee name.
the third data and fourth data is username and password which will be used in the to login to the main menu. After the user fill the data, then the user need only to click the add item then the data will be stored in the employee table.
To delete certain data, the user will only need to put the employee id of the data that the user want to delete and after that the data will be deleted.
Reset button is used to undo the data that the user write on the menu.
Back button is used to move the user to the main menu.
Customers Menu

Customer Menu is used to fill or delete data on the Customer table. Customer table is used to record customer’s data that will be used in the transaction table later on.
There are 3 data that need to be fill in the Customer Menu if the user want to add new customer.
The first data that need to be fill is Customer ID which as long as the number isn’t the same as another Customer ID.
After that there is Customer Name which determine the name for the customer in that data and the last one is Membership ID which is located in the Membership table.
For the Membership ID user can only put ID number that is already in the Membership ID and since Membership table only have three membership type that mean user can only put one of the three Membership ID that is already listed in the Membership table, if the user want to see the membership table then the user can look at it in the main menu.
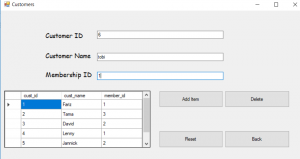
For the delete button, it is the same as other menu that the user need only put the ID of the data that the user want to delete.
Catalog Menu
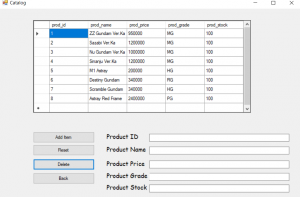
Catalog menu is used to add or delete product in the Catalog table. To add a product, the user need to fill all the data required in the Catalog Menu.
The first one is the Product ID which used to indicate ID for the product that will be put later on,
next is the product name which will be the name of the product that the user want to create,
after that is the product price to declare the pricing of the product,
next is Product grade, product grade is a type of the gunpla model that you want to put like for example MG which mean master grade is a grade of product’s in the gunpla line, the reason for that is because there are many gunpla which have the same name and the only thing that differentiate them is the Grade of the product.
The last one is product stock which indicate how many the store have for the related product.
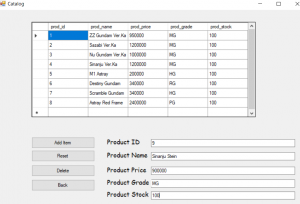
As for the delete function, it is the same as other menu is that the user only need the ID for the chosen product to be deleted.
Transaction Menu
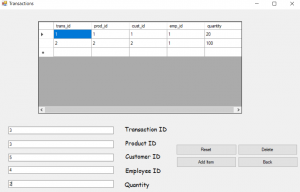
Transaction Menu Is used to make a transaction that occur in the shop. To add a transaction you need to fill the data needed for the transaction like what kind of product the customer want to buy and who is the customer that buy that product and also who is the employee that handle the transaction and the quantity that the customer want to buy.
To add a transaction, the user need to input the ID’s of the data that needed in the Transaction Menu for example the picture above show that the user want to put a transaction with customer that have the Customer ID number 5 and product that have Product ID number 3 and will be handled by employee with the Employee ID number 4 with the quantity of 2.
For the delete function, it is the same as other Menu is that the user only need the ID for the transaction that the user want to delete.